






How to Lay Porcelain Paving: The Complete UK Guide
Porcelain paving is laid on a full mortar bed over a compacted MOT Type 1 sub-base, with slurry primer brushed onto the back of every slab and the slab laid while that primer is still wet. The three rules that decide whether it lasts: full bed (never spot-bedding), full primer coverage, and wet-to-wet contact. Get those right and a porcelain patio lasts 30+ years. Get any of them wrong and slabs start rocking within a year or two. It's well within reach as a DIY job if you're methodical and have access to a wet cutter.
Laying porcelain is not the same as laying natural stone. It's denser, it's non-porous, it won't bond without primer, and it shows every levelling error you make. None of that puts it out of DIY reach — but it does mean the method matters more than it does with riven sandstone, where a slightly generous mortar bed forgives a lot. This is the full method, in order, with the mistakes that cause most failures.

Can you DIY this? An honest assessment
Four questions worth answering before you commit:
Have you laid paving before? If you've done natural stone or block paving successfully, you have the fundamentals. Porcelain is the same job done more precisely.
Are you up to the physical side? A 900×600 20mm slab is around 24–26kg. A 1200×600 is heavier again and always a two-person lift. You'll be moving dozens of them.
Can you get a wet cutter? Non-negotiable. Porcelain cannot be dry-cut — it chips the material and produces dangerous silica dust. Hire one for the weekend if you don't own one.
Can you work to tight tolerances? Porcelain's uniform edges and tight joints mean any levelling error is visible. You need to check every slab as you lay it, not at the end.
If most of those are a yes, crack on. If not, understanding the method still helps you judge quotes and spot a contractor cutting corners.
Tools and materials
Tools: wet cutter with a porcelain blade; spirit level (1200mm ideally, 900mm minimum); rubber mallet; shovel and mixing equipment; wide brush for priming; tile spacers (3–5mm); string line and pegs; tape measure and chalk line; plate compactor (wacker plate) for the sub-base; bucket and sponge for cleaning as you go; knee pads; goggles, dust mask and gloves.
Materials: your porcelain slabs plus 10% for cuts and breakages; MOT Type 1 sub-base aggregate; sharp sand and cement for the bed; slurry primer; jointing compound suitable for porcelain.
Work out quantities before you order. A 900×600 slab covers 0.54m² (about 1.9 per m²); 600×600 covers 0.36m² (2.78 per m²); 1200×600 covers 0.72m² (1.4 per m²). Add 10% to your measured area. Our patio cost calculator does the maths including materials.
Step 1: Excavate and build the sub-base
Work out your depth from the top down: slab thickness (20mm) + mortar bed (40–50mm) + sub-base (150mm) — roughly 210–220mm below your finished patio level. If the patio meets the house, the finished surface must sit at least 150mm below the damp proof course.
Excavate to that depth, removing all topsoil, turf, roots and soft material until you reach firm undisturbed ground. Extend 100–150mm beyond the patio edge for edging and haunching.
Then lay MOT Type 1 in layers no thicker than 75mm, compacting each layer separately with a plate compactor. Dumping 150mm in one go and compacting from the top doesn't work — the force doesn't reach the bottom. Two compacted layers gets you a solid 150mm.
Set your drainage fall before you build up: minimum 1:60 running away from the house, and make sure the water has somewhere to go at the low end. Full detail in our sub-base guide.
You do not need to pour a concrete slab for a garden patio. A properly compacted MOT Type 1 sub-base under a full mortar bed is the correct method for external porcelain and is what the British Standard covers. Concrete slabs are for laying over existing concrete, balconies and raised structures — not a requirement for a normal garden. If you already have sound concrete down, see laying paving over concrete.
Step 2: Plan the layout before you mix anything
Dry-lay first. Set slabs out loose to see where cuts fall, whether the pattern works, and whether shifting your starting point saves you awkward slivers at the edges.
Start from the most visible line — usually the edge nearest the house or the main view — and work towards the boundary, so cut pieces end up where they're least noticed.
Common layouts for 900×600: running (brick) bond, offsetting each row by half a slab, is the most popular and the most forgiving. Stack bond, a straight grid, looks sharper but shows any levelling error immediately. Mixing orientations creates interest but adds cutting.
Mark your starting lines with a chalk line, and set string lines at finished level including the fall so you have a reference throughout.
Step 3: Mix and lay the mortar bed
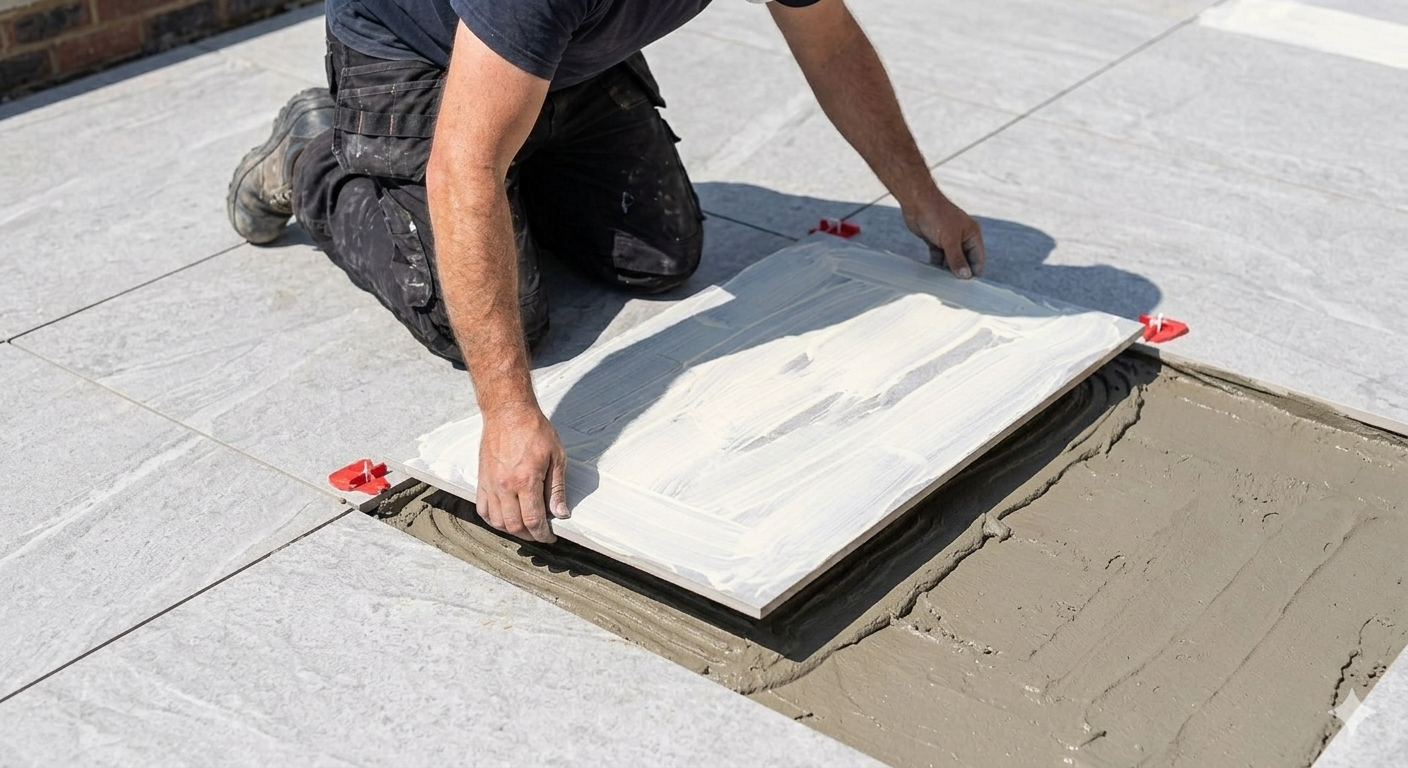
Porcelain goes on a full mortar bed — a continuous bed of sharp sand and cement, not blobs.
Mix: 4:1 to 6:1 sharp sand to cement (not building sand). Use 4:1 as standard; 6:1 works where you're using a permeable jointing compound and want more drainage through the bed.
Consistency: wet enough to work and hold shape when squeezed, not so wet it slumps or weeps water.
Depth: lay the bed at 50–60mm loose; it compacts to 40–50mm as you tamp the slab down.
Area: only bed as much as you'll cover in the next 20 minutes or so, before it starts to skin over.
Never spot-bed porcelain. "Dots and dabs" — five blobs of mortar under each slab — leaves voids, and porcelain is rigid enough that the unsupported areas flex and crack under load. Full bed, every slab, no exceptions. This is the second most common cause of porcelain failure after skipping primer.
Step 4: Prime the back of every slab
This is the step that separates porcelain from natural stone, and the one DIYers most often skip.
Porcelain is vitrified — effectively glass-like, with water absorption below 0.5%. There are no pores for cement to grip. Without primer, the mortar cures against a sealed surface and never bonds; the slab is held by weight and friction alone, and thermal movement and frost will work it loose.
How to do it:
Mix your slurry primer with water to the manufacturer's ratio — a thick, paint-like consistency. Brush it across the entire back of the slab, right into the corners and edges. Then lay the slab immediately, while the primer is still wet.
That last point is the one that matters most. Primer works by bonding wet-to-wet with the mortar bed. If it dries first, you've created a cured layer for the mortar to bond to rather than a bridge between the two — which defeats the purpose. Prime one slab, lay it, prime the next. Never prime a batch in advance.
Mix small quantities — primer has a working life of roughly 10–15 minutes. And wipe any primer off the face of the slab straight away; dried slurry on a light-coloured porcelain surface is very hard to remove. Full detail in our porcelain primer guide.
Step 5: Lay and level
Lower the slab onto the bed — don't slide it. Sliding drags the primer and disturbs the bed.
Tap it down with a rubber mallet, working from the centre outwards. Gentle taps, never a metal hammer — porcelain chips.
Check level immediately, in three directions: across the slab, against its neighbours, and along the fall. Adjust now, while the bed is still workable. Once it's set, your only option is lifting the slab and starting again.
Use tile spacers for consistent 3–5mm joints. Don't butt slabs tight — porcelain needs joint width for movement and for the jointing compound to key into.
Work in sections of 2–3m², finishing each fully before moving on, so you can still correct alignment. And stay off newly laid slabs for at least 24 hours.
Step 6: Cutting
Wet cutting only. Dry-cutting porcelain destroys the blade, chips the edges, and releases silica dust that's genuinely hazardous.
Measure twice and mark clearly. Keep water flowing constantly. Cut slowly and steadily — rushing chips the glazed edge. Wear goggles and a mask. And where you can, position cut edges against walls and borders rather than in open sightlines.
Step 7: Joint the patio
Leave the slabs at least 24 hours before jointing — 48 is better. The bed needs to have taken its initial set.
Remove the spacers and clean any mortar or primer residue out of the joints. Then apply a jointing compound suitable for porcelain — standard sand and cement grout doesn't bond well to a vitrified edge, which is why porcelain-specific compounds exist.
Work it fully into the joints, and clean the surface as you go, within about 15 minutes of application, working in small sections. Compound left to dry on the face of the slab is the single most common finishing mistake — it leaves a cloudy haze that then needs a dedicated haze remover to shift.
Porcelain itself never needs sealing. The joints may benefit from it, depending on the compound you use.
The mistakes that cause most failures
Skipping primer. The number one cause. Looks fine for six to twelve months, then slabs start rocking.
Spot-bedding instead of a full bed. Voids under a rigid slab lead to cracking.
Letting primer dry before laying. Defeats the bond entirely — wet-to-wet or it hasn't worked.
Laying on sand. Sand gives porcelain nothing to bond to. See can you lay porcelain on sand for why this fails and what it costs to put right.
Compacting the sub-base in one thick layer. A plate compactor only reaches about 75mm. Build up in layers.
Dry cutting. Ruined edges, ruined blade, hazardous dust.
Not checking levels as you go. "I'll sort it later" becomes "I'll live with it."
Leaving jointing compound to dry on the surface. Easy to prevent, tedious to fix.
When to bring in a professional
DIY isn't always the right answer. Consider hiring in for: large areas (50m²+), where the physical workload becomes punishing; complex patterns, curves or circles; sloped or awkward sites where establishing falls is tricky; driveways, which carry vehicle loads and need the base and bedding exactly right; and any job with a hard deadline.
Even then, this guide is worth reading — knowing the method is how you tell a good quote from a bad one. If a contractor proposes spot-bedding, skipping primer, or laying porcelain on sand, you now know to walk away.
Aftercare
First 48 hours: stay off it entirely.
First week: light foot traffic only, no heavy furniture.
First month: no pressure washing — let the joints harden fully.
After that: sweep as needed and wash once or twice a year. Porcelain never needs sealing, and it doesn't fade. See our porcelain cleaning guide.
Everything you need for the job
Porcelain paving, primer and jointing compound — all prices include VAT and free UK mainland delivery.
Browse Porcelain Primer & JointingFrequently asked questions
What do you lay porcelain paving on?
A full mortar bed of sharp sand and cement (4:1 to 6:1), 40–50mm thick, over a compacted MOT Type 1 sub-base of at least 150mm. Every slab must be primed on the back with slurry primer and laid while the primer is wet. Porcelain cannot be laid on sand, and spot-bedding is never acceptable.
Do you need a concrete base for porcelain paving?
Not for a normal garden patio. A properly compacted MOT Type 1 sub-base under a full mortar bed is the correct method for external porcelain. A concrete base is relevant when you're laying over existing sound concrete, or on a balcony or raised structure — not something you need to pour from scratch for a garden.
Why does porcelain need primer?
Porcelain is vitrified, with water absorption below 0.5% — there are no pores for cement to grip, so mortar cannot bond to it unaided. Primer creates a bonding bridge between slab and bed. Without it, the slab sits on the mortar held only by weight and friction, and works loose within one to two years.
Can you lay porcelain on a sand bed?
No. Sand offers no bond to a non-porous slab, and it shifts and washes out. Porcelain laid on sand typically looks fine for six months, then starts rocking, lifting at the corners and cracking open at the joints. It needs a full mortar bed with primer.
How thick should porcelain paving be?
20mm is the UK standard for outdoor porcelain and is correct for patios, paths and garden use. Porcelain can also be used on driveways at 20mm, but only with a deeper compacted sub-base, a full mortar bed and correct priming — the installation method matters far more than the slab thickness. For driveways many people prefer setts at 40–50mm instead.
How long before you can walk on new porcelain paving?
Stay off it for at least 24 hours after laying, and ideally 48 before jointing. Light foot traffic only for the first week, no heavy furniture, and avoid pressure washing for the first month while the joints harden.