


Can You Lay Porcelain on Sand? Installation Methods Explained (UK Guide)
Short answer: No. Absolutely not.
Longer answer: You can physically place porcelain slabs on sand. They'll sit there looking perfectly fine. For about six months. Then they'll start rocking. Joints will crack. Slabs will lift at corners. Eventually, you'll be ripping the whole thing up and starting again—this time doing it properly, on a full mortar bed.
Here's why this question comes up so often: porcelain paving looks identical to natural stone paving. Natural stone CAN be laid on sand (though mortar is still better). So people assume the installation method is the same. It's not. Porcelain and sandstone might look similar, but they behave completely differently when it comes to bedding and bonding.
This isn't about suppliers trying to sell you extra materials. This is about fundamental material science—specifically, porosity, water absorption, and adhesion. Understanding why porcelain needs mortar (and priming) prevents costly installation failures.
At Universal Paving, we sell both porcelain and natural stone. We're honest about installation requirements because failed patios create warranty claims, bad reviews, and unhappy customers. Getting it right first time costs less than doing it twice.

Why People Think Porcelain Can Go on Sand
The confusion is understandable. Several factors create the "porcelain on sand" myth:
1. Natural Stone Precedent
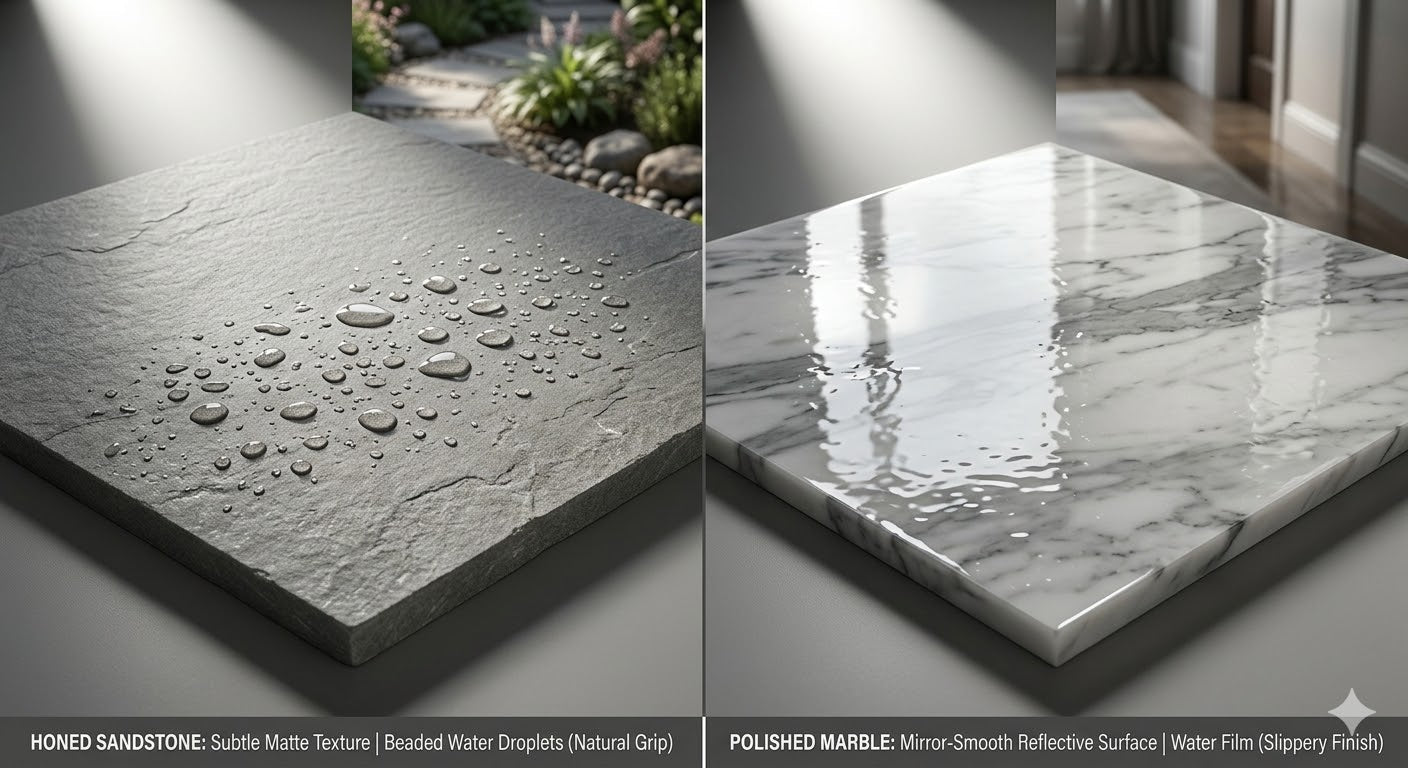
Indian sandstone, limestone, even granite—these CAN be laid on a sand bed (though sharp sand and cement mix is better). The technique works because natural stone is porous. It absorbs moisture from the bedding layer, creating a bond as materials cure together.
Logic: "If sandstone works on sand, porcelain should too—they're both paving slabs."
Reality: Porcelain is vitrified (glass-like). Zero porosity. It won't absorb anything from sand, so no bond forms.
2. Indoor Tile Experience
People have laid ceramic tiles indoors using sand-and-cement screed. Some porcelain floor tiles go down the same way. This creates false confidence.
The difference: Indoor tiles are thin (8-10mm), bedded on solid concrete sub-floor, protected from weather, and use tile adhesive—not just sand. Outdoor porcelain is thicker (20mm), subjected to freeze-thaw cycles, and needs completely different installation standards.
3. "I Saw It on YouTube"
Plenty of DIY videos show people laying pavers on sand. Some are natural stone (where it's marginal), some are concrete pavers (which work differently), and some are just... wrong. YouTube doesn't have quality control.
4. Cost Cutting
Full mortar bed installation costs more—both in materials (sand, cement, primer) and labour (more time-consuming). Sand-only bedding is cheaper and faster. When budget is tight, the temptation to skip "unnecessary" steps is strong.
The problem: You're not saving money. You're delaying the inevitable replacement cost.

What Makes Porcelain Different: The Science
Understanding why porcelain needs different installation starts with understanding what porcelain actually is.
Porcelain Manufacturing
Porcelain paving is made from fine clay, minerals, and pigments pressed at extremely high pressure (400+ tons) then fired at 1,200-1,400°C. This vitrification process creates a dense, glass-like material.
Key characteristics:
- Water absorption: <0.5% (essentially zero)
- Density: 2,400 kg/m³ (very dense)
- Porosity: Virtually non-existent
- Surface: Sealed during firing
Natural Stone for Comparison
Indian sandstone is sedimentary rock formed from compressed sand over millions of years. It remains porous.
Key characteristics:
- Water absorption: 3-6% (significant)
- Density: 2,200-2,400 kg/m³ (varies)
- Porosity: Moderate to high
- Surface: Open pores, absorbent
Why This Matters for Bedding
Natural stone on sand/cement:
- Moisture from bedding mix contacts stone underside
- Stone absorbs moisture into pores
- Cement particles migrate into stone surface
- As bedding cures, stone and mortar interlock
- Bond forms through mechanical and chemical adhesion
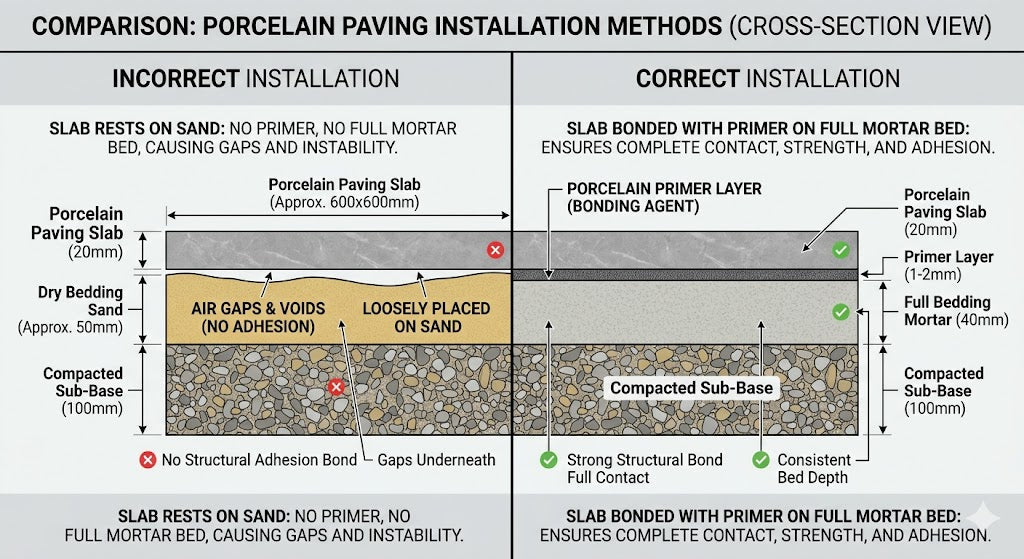
Porcelain on sand/cement (without primer):
- Moisture contacts porcelain underside
- Porcelain absorbs NOTHING (vitrified surface)
- No cement particle migration
- Bedding cures independently of porcelain
- No bond forms—just friction and weight
The result: Porcelain sits on the bed but isn't bonded to it. Any movement, thermal expansion, frost heave, or settlement causes slabs to shift.
The Correct Installation Method for Porcelain
Professional porcelain installation follows a specific process. Every step matters.
1. Excavation and Sub-Base (100-150mm)
Dig out to accommodate:
- 100-150mm compacted MOT Type 1 sub-base
- 40-50mm mortar bed
- 20mm porcelain thickness
- Plus clearance below damp-proof course
Compact sub-base thoroughly with plate compactor. This creates stable foundation.

2. Mortar Bed Preparation (40-50mm)
Mix ratio: 4:1 to 6:1 sharp sand to cement (not builder's sand)
- 4:1 for standard applications
- 6:1 if using permeable jointing compound (allows drainage)
Consistency: Wet but workable—should hold shape when squeezed but not ooze water.
Application: Full bed coverage. Not "dots and dabs" (five-spot method). Every square centimetre of porcelain must contact mortar. Voids underneath cause cracking.
Thickness: Lay mortar bed at 50-60mm initially. It compacts to 40-50mm when slab is tamped down.
3. Priming (Critical Step)
This is the game-changer that makes porcelain stick.
What is primer? Slurry-based adhesive applied to porcelain underside. Creates bonding bridge between non-porous porcelain and mortar bed.
Application:
- Mix primer according to manufacturer instructions (powder + water)
- Brush evenly onto slab back just before laying
- Work quickly—primer stays workable for 10-15 minutes
- Don't let primer touch slab face (impossible to remove once dry)
Products: EASYPrime, Pro-Prime Slurry Primer, NEXUS porcelain primer (£40-60 per tub, covers ~25-30m²)
Cost: Adds roughly £1.50-2/m² to project cost.
Skipping this step: Single biggest cause of porcelain paving failure.
4. Laying and Levelling
- Place primed slab onto fresh mortar bed
- Tap down gently with rubber mallet (not metal—will crack porcelain)
- Check level with spirit level
- Adjust quickly before primer cures
- Ensure 70%+ contact between slab and mortar
- Leave 5-6mm joints (use spacers)
5. Jointing (24-48 Hours Later)
Use proper porcelain jointing compound (not just sand). Products like EASYJoint, Nexus Porcelain Grout, or similar specialist compounds.
Why specialist jointing? Porcelain doesn't absorb moisture from regular sand-cement grout. Specialist compounds are formulated to bond to vitrified surfaces.
What Happens When You Lay Porcelain on Sand
Let's be specific about failure modes. This isn't theoretical—this is what actually happens.
Timeline of Failure:
Months 1-3: Looks perfect. No obvious problems.
Months 4-6: First signs appear:
- Slight rocking on some slabs when stepped on
- Hollow sound when tapped
- Minor joint movement
Months 7-12: Deterioration accelerates:
- Pronounced rocking on multiple slabs
- Corners lifting (especially on larger 900x600 slabs)
- Joints cracking and opening up
- Water pooling in uneven areas
Year 2+: Serious failure:
- Slabs tipping when walked on edge
- Complete separation from bed in places
- Cracked slabs (from unsupported areas flexing)
- Weed growth through widened joints
- Safety hazard—trip risks from uneven surface
Why It Fails:
1. No adhesion: Sand provides zero bond to vitrified porcelain. Slabs sit purely under own weight.
2. Frost heave: UK freeze-thaw cycles cause sub-base expansion. Without bonded connection, slabs lift with frost, don't return to original position when thawed.
3. Thermal movement: Porcelain expands and contracts with temperature. Without adhesive bond, expansion pushes slabs apart, contraction leaves gaps.
4. Point loading: Walking on slab edges creates cantilever effect. Unsupported areas flex, crack over time.
5. Settlement: Any sub-base settlement causes slabs to tilt. No adhesive means they stay tilted.

Real Example:
Customer in Birmingham laid Kandla Grey porcelain 900x600mm on compacted sand (no mortar, no primer). "Looked great initially, saved £300 doing it myself."
Six months later: Noticeable rocking on 8 slabs. Nine months: Corners lifting on 12 slabs. Twelve months: Called professional installer. Quote to fix: £1,400.
Total cost: £600 original DIY + £1,400 professional reinstall = £2,000
Cost if done right first time: £900
"Saved" £300, spent £1,100 extra.
Cost Comparison: Doing It Right vs Doing It Twice
Let's put actual numbers on this for a typical 25m² patio.
DIY Sand Bed (Incorrect Method):
- 25m² porcelain paving: £480 (based on £19.09/m²)
- Sharp sand (bedding): £60
- MOT Type 1 sub-base: £80
- Basic tools/hire: £40
- Total: £660
Correct Mortar Bed Installation (DIY):
- 25m² porcelain paving: £480
- Sharp sand: £80 (more needed for mortar)
- Cement: £50 (10 bags)
- Primer: £50 (one tub)
- Jointing compound: £60
- MOT Type 1 sub-base: £80
- Tools/hire: £40
- Total: £840
Difference: £180 for correct materials.
Professional Installation:
- Materials: £840
- Labour: £500-700 (£20-28/m²)
- Total: £1,340-1,540
Reinstallation After Sand Bed Failure:
- Original DIY cost: £660
- Remove failed installation: £200 (labour + skip hire)
- New mortar bed professional install: £1,340-1,540
- Total spent: £2,200-2,400
Paying £180 extra for correct materials saves £1,360-1,560 long-term.
When DIY Makes Sense (And When It Doesn't)
DIY Porcelain Installation: Suitable If:
✅ You have prior paving experience (laid natural stone before)
✅ You understand mortar mixing and bedding techniques
✅ You own or can hire proper tools (plate compactor, mixer, wet saw)
✅ You're prepared to follow instructions precisely (primer, full bed, etc.)
✅ Project is small-medium (under 30m²)
✅ You have time (professional work takes 2-3 days, DIY takes 4-5+)
Hire a Professional If:
❌ First time laying any paving
❌ Large project (40m²+)
❌ Complex cutting required (curves, angles, intricate patterns)
❌ Working near buildings (damp-proof course considerations)
❌ Uneven or challenging ground conditions
❌ Time-constrained (want it done quickly and right)
Professional cost: £20-28/m² labour on top of materials. For 25m² patio, that's £500-700. Worth it for guaranteed results and warranty.
The "Just Concrete Pavers" Exception
One important clarification: concrete pavers (block paving) CAN be laid on compacted sand. This is the correct method for concrete blocks.
Why concrete blocks work on sand but porcelain doesn't:
- Concrete pavers are typically 50-80mm thick (porcelain is 20mm)
- Designed for interlocking installation (mutual support)
- Usually laid over large areas (weight distribution)
- Manufactured specifically for sand-bed installation
- Different material properties (porous concrete vs vitrified porcelain)
Don't confuse block paving installation with slab paving installation. Different products, different methods.
Universal Paving's Recommendation
We sell porcelain paving because it's an excellent product—durable, low-maintenance, consistent quality, 25+ year lifespan. But only when installed correctly.
Our advice:
For DIY installers: Follow the full mortar bed method. Don't skip primer. Budget for correct materials. Watch professional installation videos (not random YouTube clips). Allow proper time.
For those uncertain: Hire an accredited installer. The £500-700 labour cost for a 25m² patio is insurance against £1,500 reinstallation costs.
For budget-constrained projects: If you genuinely can't afford mortar bed installation, choose natural stone paving instead. Riven sandstone costs similar to porcelain (£20-23/m²) and CAN be laid on sand-cement bed (though mortar is still better). You lose porcelain's benefits (consistency, zero maintenance) but you get a properly installed patio that won't fail.
Never compromise on installation to afford the material. Better to have correctly installed sandstone than incorrectly installed porcelain.
The Verdict: Porcelain Needs Mortar (And Primer)
Can you physically lay porcelain on sand? Yes.
Will it work long-term? No.
Should you do it? Absolutely not.
Porcelain paving is a premium product with specific installation requirements. The non-porous vitrified surface that makes it stain-resistant, frost-proof, and low-maintenance also makes it incompatible with sand-bed installation.
The correct method:
- 100mm compacted MOT Type 1 sub-base
- 40-50mm full mortar bed (4:1 to 6:1 sharp sand to cement)
- Priming slurry on porcelain underside
- Proper jointing with specialist compound
The cost difference between sand-only and correct mortar bed installation is £180 for materials on a 25m² patio. That £180 prevents £1,500+ reinstallation costs within 1-2 years.
Browse Universal Paving's full porcelain paving range:
- Kandla Grey porcelain: £19.09/m² (most popular)
- Anthracite Grey: £19.09/m² (contemporary dark)
- County Light Grey: £19.09/m² (pale modern)
- All R11 slip-rated for UK outdoor use
Installation supplies:
- Primer: Available from specialist suppliers
- Jointing compound: EASYJoint and similar products
- Professional installation: £20-28/m² labour
Need installation advice?
- Phone: 07480 959706
- Free UK delivery on all paving orders
- Samples available: £5, delivered 5-7 days
- Monday-Friday 8am-5:30pm, Saturday 9am-3pm
Porcelain paving delivers 25+ years of beautiful, low-maintenance outdoor living—when installed correctly. Cutting corners on installation destroys that value. Do it right first time.