


Paving Mortar Mix: The Right Ratio for Every Material
The standard mortar mix for laying paving slabs is 5:1 — five parts sharp sand to one part cement, mixed to a semi-dry consistency. For pointing (filling joints), use 3:1 sharp sand to cement, or use a pre-mixed jointing compound like Ultrascape Flowpoint which eliminates mixing entirely. For porcelain paving, add SBR primer to both the mortar mix and the back of each slab — without it, the mortar won't bond to the non-porous surface.
Mortar mix isn't complicated — but it's the foundation your entire patio sits on. Get the ratio wrong, the consistency wrong, or the application wrong, and the best paving slabs in the world won't save the project. This guide covers the exact ratios for every stage of a paving installation, explains when and why to add SBR, and flags the mixing errors that cause most DIY failures.
The three mixes you need
A paving installation uses up to three different mortar mixes at different stages. Each has a different ratio for a reason:
| Stage | Mix ratio | Consistency | Purpose |
|---|---|---|---|
| Bedding mortar | 5:1 | Semi-dry — holds shape when squeezed | Full bed under each slab |
| Pointing mortar | 3:1 | Slightly wetter — smooth, workable | Filling joints between slabs |
| SBR slurry (porcelain) | SBR + cement | Thick paint consistency | Primes non-porous surfaces |
1. Bedding mortar (5:1)
This is the main mix — the mortar bed that sits between the compacted sub-base and the paving slab.
The ratio
5 parts sharp sand : 1 part Portland cement
Use sharp sand (also called grit sand or concreting sand), NOT building sand (soft sand). Sharp sand has angular grains that lock together and create a stronger, more rigid mortar. Building sand is fine and rounded — it produces a weaker mix that crumbles over time.
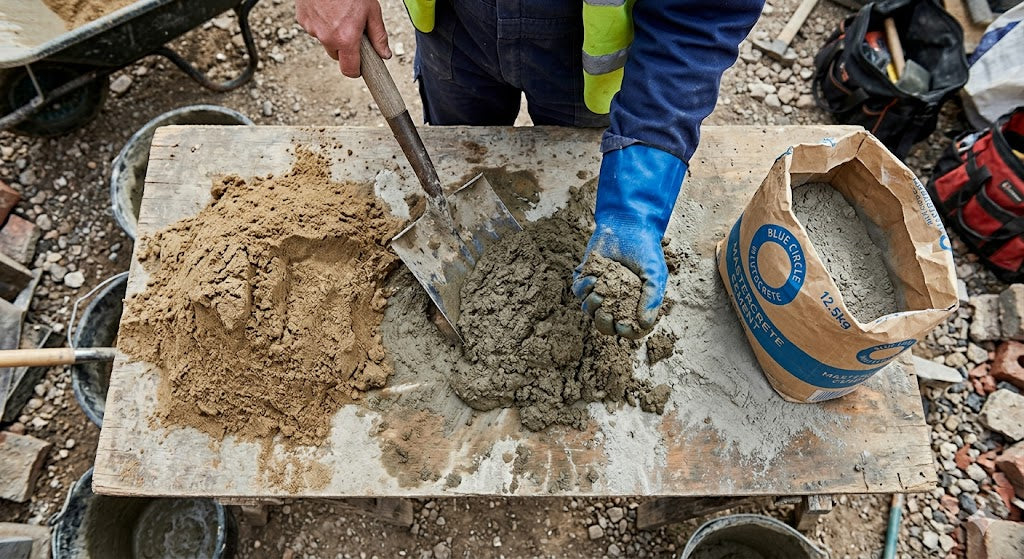
The consistency
Add water gradually until the mix reaches a semi-dry consistency. The test: squeeze a handful firmly. It should hold its shape without crumbling and feel damp, but no water should drip out. If water drips, it's too wet. If it crumbles apart immediately, it's too dry.
Semi-dry mortar is critical because:
• Too wet — the slab sinks under its own weight, making levelling impossible. Excess water weakens the set mortar and causes shrinkage cracks.
• Too dry — the mortar doesn't compact properly and doesn't bond to either the sub-base or the slab. Slabs rock and lift within weeks.
How much do you need?
For a 20-30mm mortar bed on a 20m² patio, you'll need approximately:
| Material | Quantity (20m²) | Approximate cost |
|---|---|---|
| Sharp sand | 0.5-0.6 tonnes (approximately 10-12 bags at 25kg) | £40-60 |
| Cement | 4-5 bags (25kg each) | £25-35 |
Adding SBR for extra strength
Adding a capful of SBR bonding agent to the mixing water improves adhesion — particularly useful when laying over concrete or on exposed, frost-prone patios. It's optional for sandstone on a standard sub-base but recommended for any situation where maximum bond strength matters.
Full mortar bed — never spot-bed. Spread the mortar across the entire area where each slab will sit. Spot-bedding (5 blobs of mortar at the corners and centre) leaves 70% of the slab unsupported. The unsupported areas flex under foot traffic and crack. This is the single most common cause of cracked paving slabs — and it's entirely avoidable. Read our laying guide for the full method.
2. Pointing mortar (3:1)
Pointing fills the joints between laid slabs. It uses a stronger, slightly wetter mix than bedding mortar because it needs to bond tightly in narrow gaps and resist weather exposure on all surfaces.
The ratio
3 parts sharp sand : 1 part Portland cement
The higher cement content (compared to 5:1 bedding) creates a harder, more weather-resistant joint. Some professionals use 4:1 for pointing — both are acceptable. Never use 5:1 for pointing — it's too weak and crumbles out of joints within a season.
The consistency
Slightly wetter than bedding mortar — workable enough to push into narrow joints with a pointing trowel, but not so wet that it slumps or stains the slab faces. It should hold a sausage shape when rolled in your hand.
The better alternative: jointing compound
Traditional sand-and-cement pointing works but has limitations: it's slow to apply, cracks within 2-3 years as it shrinks, and allows weed growth through the cracks. Pre-mixed jointing compound is faster, lasts 10+ years without cracking, inhibits weed growth, and requires no mixing. It costs more per joint (£50-55 per tub vs £10-15 for sand and cement) but saves time and lasts significantly longer.
Read our complete jointing compound guide for application method and which product to use for each paving material.
3. SBR slurry (porcelain paving only)
Porcelain is non-porous — standard mortar won't bond to it. SBR primer creates a chemical adhesion layer that locks the mortar to the slab.
For priming the back of each porcelain slab
Brush neat (undiluted) SBR onto the back of each slab and allow it to become tacky before laying onto the mortar bed. This creates a sticky surface that the mortar grips onto.
For priming an existing concrete base
Dilute SBR at 3:1 (3 parts water to 1 part SBR) and brush over the entire concrete surface. Wait until tacky before applying the mortar bed. This bonds the new mortar to the old concrete. Read our laying over concrete guide for the full method.
For adding to the bedding mortar
Replace some of the mixing water with SBR (approximately 1 part SBR to 4 parts water). This creates a mortar bed that bonds more aggressively to both the sub-base and the primed slab. Optional for sandstone, recommended for porcelain.
Summary for porcelain: SBR goes on the concrete base (if applicable), into the mortar mixing water, AND on the back of every slab. Three layers of bonding for a material that naturally repels mortar. Skip any one and the bond weakens. Read our porcelain pros and cons — SBR is Con #4.
Mortar mix by paving material
| Material | Bedding mix | SBR needed? | Jointing |
|---|---|---|---|
| Sandstone (riven) | 5:1 semi-dry | Optional (recommended) | Flowpoint or 3:1 mortar |
| Sandstone (sawn) | 5:1 semi-dry | Recommended | Flowpoint or 3:1 mortar |
| Porcelain | 5:1 semi-dry + SBR in water | Mandatory (back of slab + mix) | Porcelpoint only |
| Limestone | 5:1 semi-dry | Recommended | Flowpoint or 3:1 mortar |
| Granite | 5:1 semi-dry + SBR | Recommended (low porosity) | Flowpoint or 3:1 mortar |
| Slate | 5:1 semi-dry | Recommended | Flowpoint or 3:1 mortar |
| Over concrete | 5:1 semi-dry + SBR in water | Mandatory (on concrete surface) | As above per slab material |
5 mortar mixing mistakes
Building sand (soft sand) has fine, rounded grains that produce a weak, crumbly mortar. Sharp sand has angular grains that interlock and create a strong, rigid bed. This is the most common material mistake — builders merchants stock both, and they look similar. Ask for sharp sand, grit sand, or concreting sand. Never soft or building sand for bedding mortar.
Wet mortar is easier to work with, so DIYers keep adding water until it flows. But excess water weakens the cured mortar dramatically — it creates air pockets as the water evaporates, reducing density and bond strength. It also causes shrinkage cracks as the excess moisture leaves the mix. Semi-dry is harder to spread but sets stronger. Add water gradually and stop as soon as the squeeze test works.
Some DIYers use 3:1 or even 2:1 for the bedding mix, thinking more cement means stronger mortar. It doesn't — it creates a brittle mix that cracks rather than flexing with minor ground movement. A 5:1 mix has enough flex to absorb natural thermal expansion and contraction without cracking. Save the 3:1 ratio for pointing, where hardness matters more than flexibility.
Mix mortar on a clean board or in a clean bucket/mixer. Dirt, leaves, old cement, or organic material contaminating the mix weakens the bond and can cause staining on light-coloured stone. If mixing on the ground, use a mixing board or a large sheet of plywood.
Mortar begins to set within 60-90 minutes of mixing. If you mix a full barrow load and only lay 3-4 slabs per hour, the remaining mortar starts hardening before you use it. Mix in small batches — enough for 4-6 slabs at a time. Discard any mortar that's started to stiffen. Re-wetting set mortar (adding water to revive it) weakens it permanently.
Ready to start your patio?
Paving slabs, jointing compound, and everything you need — all prices include VAT and free UK delivery.
Browse Paving Slabs Browse Sandstone Paving Buy Jointing CompoundFrequently asked questions
What is the best mortar mix for paving slabs?
5 parts sharp sand to 1 part Portland cement, mixed to a semi-dry consistency. This ratio provides the right balance of strength and flexibility for a paving mortar bed. Add SBR bonding agent to the mixing water for extra adhesion, especially for porcelain paving or laying over concrete.
What sand should I use for paving mortar?
Sharp sand (also called grit sand or concreting sand). Never building sand or soft sand — the fine, rounded grains produce a weak mortar that crumbles. Sharp sand has angular grains that interlock for a stronger, more durable bed.
Do I need SBR for laying sandstone?
SBR is optional for sandstone but recommended, particularly for sawn (smooth) sandstone which has less natural texture for the mortar to grip. For riven sandstone on a standard MOT Type 1 sub-base, a standard 5:1 mix without SBR is adequate. SBR becomes mandatory only for porcelain paving and laying over concrete.
How thick should the mortar bed be?
20-30mm for most residential patios. This provides enough depth to fine-tune levels while keeping the bed thin enough to set firmly. Beds thicker than 40mm take longer to cure and are more prone to cracking. If you need more than 30mm to reach the correct level, build up the sub-base rather than increasing mortar depth.
Can I use ready-mix mortar for paving?
Pre-mixed paving mortar works well and removes the guesswork of getting ratios right. It's more expensive per m² than mixing your own (approximately £6-8 per 25kg bag vs £3-4 for sand and cement separately) but convenient for smaller patios. For large areas (20m²+), mixing your own from sharp sand and cement is significantly more cost-effective.

,%20use%203:1%20sharp%20sand%20to%20cement,%20...)