


How to Build a Patio Sub-Base: Get This Wrong and Everything Fails
The sub-base is the single most important part of any patio. It's also the part most people rush, skip, or underspec because it's invisible once the paving goes down. But here's the reality: the sub-base determines whether your patio lasts 3 years or 30. Every sinking slab, every cracked joint, every patio that develops a puddle in the middle — the problem started in the sub-base.
What a sub-base actually does
A sub-base serves three functions. First, it distributes the load from the paving and whatever's on it (furniture, people, pots) across a wider area so the underlying soil doesn't compress unevenly. Second, it provides a stable, compacted layer that doesn't shift when the ground beneath it moves with moisture and temperature changes. Third, it creates a free-draining layer that stops water pooling under the paving and causing frost heave in winter.
Without a proper sub-base, the paving sits on whatever happens to be underneath — topsoil, clay, rubble, tree roots. All of these move. The paving follows them.
Materials: MOT Type 1
The standard sub-base material for UK patio construction is MOT Type 1 (sometimes called "Type 1 crushed stone" or "hardcore"). This is a graded mix of crushed limestone or granite in sizes from 40mm down to dust. The mix of particle sizes is critical — when compacted, the smaller particles fill the gaps between the larger ones, creating an interlocking structure that's incredibly stable.
Don't use rubble, broken concrete, or random fill. These materials have unpredictable particle sizes and voids that don't compact uniformly. You'll end up with hard spots and soft spots in the sub-base, which translate directly into high slabs and low slabs on the surface. MOT Type 1 is specifically graded to compact into a uniform, stable layer. It exists for this purpose. Use it.
For driveways or areas that will take vehicle traffic, increase to 200–300mm. For clay soils that are prone to movement, 200mm is advisable even for a pedestrian patio.
Step by step
Calculate your excavation depth
Add up the layers from the top down: paving slab thickness (typically 20–22mm) + mortar bed (30–40mm) + sub-base (150mm minimum). That gives you approximately 200–210mm total depth below your desired finished patio level.
If your patio sits next to the house, the finished surface must be at least 150mm below the damp proof course (DPC). Find the DPC line on your house wall — it's usually a slightly wider course of brickwork or a visible black membrane line — and measure 150mm down from it. That's the maximum height of your finished patio. Work backwards from there to calculate how deep you need to dig.
Excavate the area
Dig out the entire patio area to the calculated depth. Remove all topsoil, organic matter, roots, and loose material. You want to reach firm, undisturbed ground — not fill or previously disturbed soil. If you hit very soft ground or areas that have been previously filled (old flower beds, buried rubble), dig deeper and backfill with extra MOT Type 1.
Extend the excavation 100–150mm beyond the planned patio edge on all sides. This gives you room for edging and haunching.
Set the fall
Before you add any sub-base material, establish your drainage fall using string lines and pegs. The fall should run away from the house (or any building) at a gradient of 1 in 60 minimum. That means 1cm of drop for every 60cm of patio width.
A 3-metre-wide patio needs approximately 50mm of fall across its width. Set your string lines at the finished patio level including the fall, then work backwards to set the sub-base level below.
Where does the water go? The fall directs water away from the house — but it needs somewhere to go at the low end. A lawn, a gravel border, a flower bed, or a drain. If the low end of your patio sits against a fence or wall with nowhere for water to drain, you'll create a puddle. Plan the drainage destination before you start digging.
Lay the sub-base material
Spread MOT Type 1 across the excavated area in layers no thicker than 75mm. You'll compact each layer separately — dumping the full 150mm in one go and compacting from the top doesn't work because the compaction force doesn't reach the bottom of the layer.
For a 150mm sub-base: lay roughly 80mm loose material (it will compact to approximately 65–75mm), compact, then lay another 80mm and compact again. This gives you two compacted layers totalling 150mm.
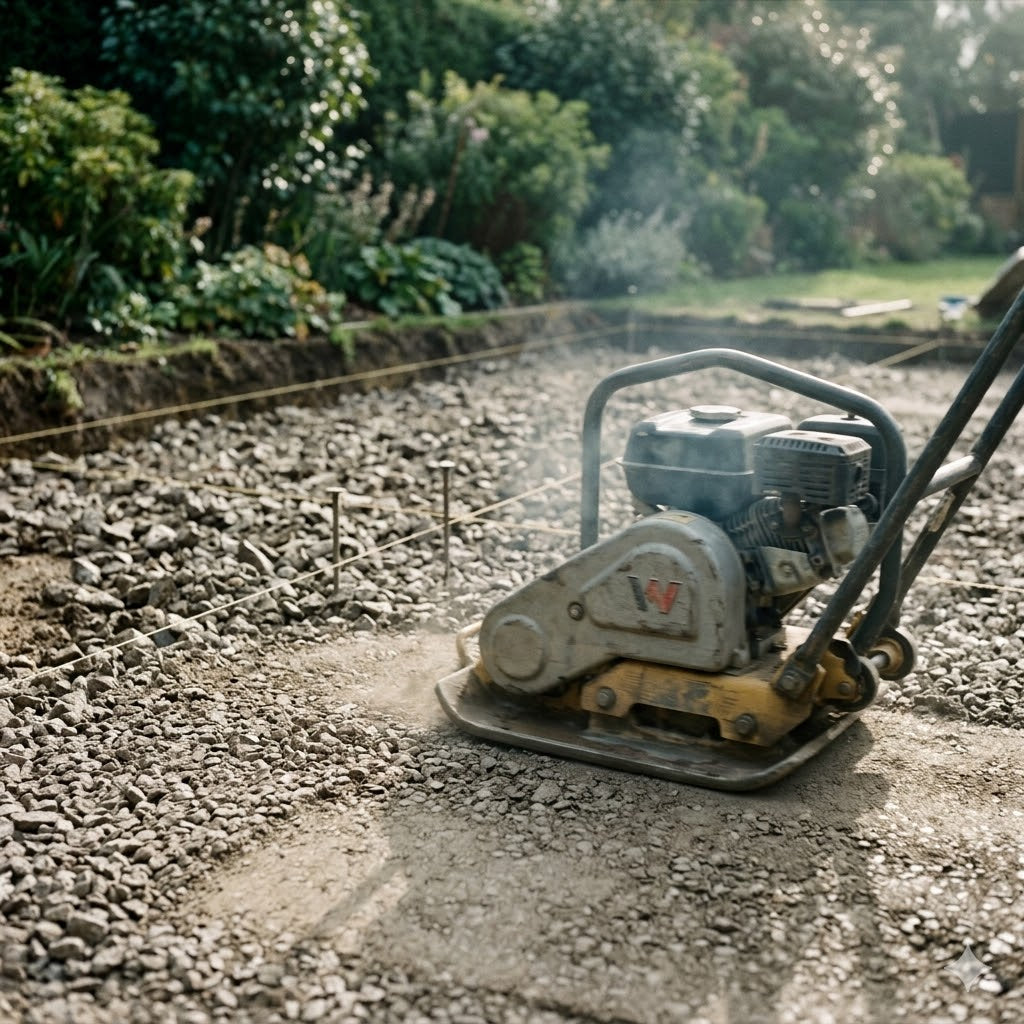
Compact
Use a wacker plate (vibrating plate compactor) for the best results. Run the plate across the entire surface in overlapping passes — like mowing a lawn. Wet the surface lightly before each pass to help the fines bind together.
You'll know it's properly compacted when the wacker plate stops sinking into the material and you can walk across the surface without leaving footprints. The surface should feel solid and sound hard when you tap it.
If you don't have a wacker plate, a hand tamper works for small patios (under 10m²) but it's hard physical work and less effective. For anything larger, hire a wacker plate — they're typically £30–50/day from tool hire shops.
Check levels
Once compacted, check the sub-base levels against your string lines. Use a long spirit level (1200mm minimum) to check both the overall fall and the local flatness. The sub-base surface should be reasonably flat and follow the established fall — but it doesn't need to be perfect. The mortar bed on top absorbs small variations of up to 10–15mm.
What it must not have is localised dips or humps larger than 20mm. These will either create thick mortar spots (dips) that take longer to cure and may crack, or thin mortar spots (humps) that don't bond properly.
Don't skip the level check. It's tempting to assume the sub-base is "close enough" because the mortar will sort it out. The mortar bed should be 30–40mm thick. If your sub-base has a 50mm dip in one area, the mortar there will be 80–90mm thick — it won't cure properly, it'll shrink, and the slab above it will eventually sink.
Common sub-base mistakes
Not compacting at all
Loose aggregate settles unevenly under the weight of the paving and foot traffic. Within 6–12 months, individual slabs start sinking as the material beneath them compresses. Compaction is not optional.
Compacting in one thick layer
A wacker plate compacts effectively to about 75mm depth. Below that, the material stays loose. If you dump 200mm of MOT Type 1 and compact from the top, the bottom 100mm is barely compacted. Build up and compact in layers.
Using the wrong material
Sand, gravel, rubble, broken concrete, and topsoil are not sub-base materials. MOT Type 1 is specifically graded to compact into a stable, interlocking layer. Other materials leave voids, drain unevenly, or compress under load.
No fall
A level sub-base creates a level patio that collects water. Every patio needs a drainage fall — ideally established at the sub-base stage so each subsequent layer follows it naturally.
Building over tree roots
Tree roots grow, heave, and shift soil. If you build a sub-base over active roots, the patio will move. Either remove the roots (check with an arborist first — some roots are critical to tree health) or relocate the patio.
Sub-base for different soil types
Sandy soil: Drains well and is relatively stable. 150mm of MOT Type 1 is typically sufficient. Sandy soil is the easiest to work with.
Clay soil: Retains water, swells when wet, shrinks when dry. Clay is the most challenging sub-base foundation. Use 200mm of MOT Type 1 minimum, and consider laying a geotextile membrane between the clay and the sub-base to prevent the clay migrating upward into the aggregate over time.
Chalky soil: Generally stable but can soften when very wet. 150mm of MOT Type 1 is usually adequate. Good natural drainage.
Peaty/organic soil: Soft, compressible, and unstable. Dig out all organic material until you reach firm ground, even if that's deeper than the standard excavation depth. Backfill with extra MOT Type 1. In severe cases, professional ground preparation may be needed.
Ready to start your patio?
Once your sub-base is sorted, browse our paving range — all in stock with free UK delivery.
Browse Sandstone Browse PorcelainFrequently asked questions
How deep should a patio sub-base be?
150mm of compacted MOT Type 1 is the standard minimum for a domestic patio. For driveways, use 200–300mm. For clay soils, 200mm is advisable even for pedestrian patios.
Can I use sand instead of MOT Type 1?
No. Sand doesn't interlock when compacted — it shifts and moves under load. MOT Type 1 is a graded mix of crushed stone from 40mm down to dust, specifically designed to compact into a stable, interlocking layer. Sand can be used as a thin levelling screed on top of a compacted MOT Type 1 base in some installation methods, but never as the sub-base itself.
Do I need a membrane under the sub-base?
On clay soils, a geotextile membrane between the clay and the MOT Type 1 is recommended. It prevents the clay migrating into the aggregate and destabilising it over time. On sandy or chalky soils, a membrane isn't usually necessary.
Can I lay paving directly on soil?
No. Soil moves with moisture and temperature changes. Paving laid on soil will shift, sink, and crack within months. A compacted sub-base is always required for any permanent paving installation.
How much MOT Type 1 do I need?
For a 150mm compacted sub-base, you need approximately 0.2 tonnes per m² (accounting for compaction from loose to compacted state). A 20m² patio needs roughly 4 tonnes of MOT Type 1. Your aggregate supplier can calculate the exact amount — tell them the area and the compacted depth you need.
